Best Way To Learn Guitar Chords

Published: 26/08/2021
Under: Guitar Lessons
I’m going to cover the best way to learn guitar chords as well as how NOT to. Here is the exact step-by-step process I use to master any new chord in the shortest possible time.
While there’s no best way to learn guitar chords fast, here are a few steps you can take to improve your guitar playing today.
How NOT to learn new chords
Sadly most guitarists try to learn chords in the wrong way. Their process usually goes something like this. First, they pick up a chord book. Next, a random guitar chord is selected. You play this chord a few times, and phew we’re done!
I’m sorry to say this method won’t help you achieve anything, and your chord dictionary will most likely stay the same size.
The same is true if you discover a new chord, write it out and file it away. It’ll make your file look that little bit bigger but won’t do anything for your knowledge!
What’s the best way to learn guitar chords?
The best way to learn guitar chords involves two steps. The first part of the process is learning the chord. Next, the second step is using the new chord.
So we’ve found a new chord. It’s an E chord:
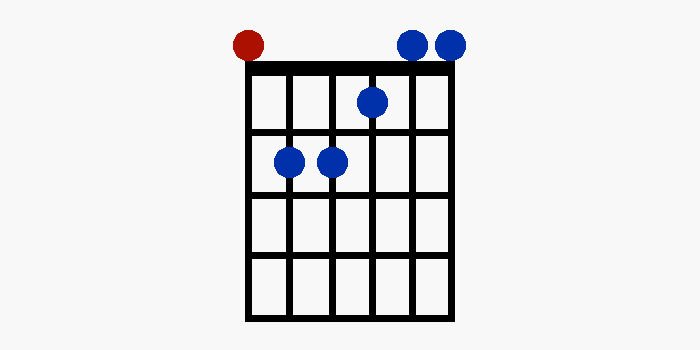
Nice and simple!
Step 1: The new chord
The best way to learn guitar chords starts with checking where the notes are on the fretboard. Ask yourself:
- Do we have any open strings?
- Can we bar a finger and cover two or more notes?
- Is there a preferred set of fingering?
- Can we use more than one set of fingers to make this chord?
Our E chord has three open strings: the 6th, 2nd, and 1st. We can’t use a finger to bar across two or more strings or notes. However, with our four fingers, we have two ways to play it.
We could play it with our 1st, 2nd, and 3rd fingers or we could use our 2nd, 3rd, and 4th fingers. Either set of fingerings work, and we should try to learn the chord with both.
Step 2: Getting the notes right
Next, we need to check that each note sounds clean. No buzzing, muffled, or extra notes. If you find a buzzing note, you’ll need to use more pressure on that string.
The best way to learn guitar chords is by adding one note at a time. Start with the low E string, and get that sounding good.
Next, add the fifth string, get that right – again NO buzzing, NO wrong or extra notes. Keep adding strings.
If you get buzzing, remove the string you’ve just added and check that what you have just had is right.
Why should we add one at a time?
If you play all six strings and it sounds OK together, you’ll move on. Even though the third string is buzzing and your first finger is muting a string that should be open.
If you add/play them one by one you’ll hear when you’re off and you’ll try to correct it. Trust me, it only takes a little more effort to get it right!
If you get buzzing when you’ve added all six, you need to locate the problem by playing each string separately. For example, the problem is your first finger on the third string.
Stop right there. Keep making small adjustments until that note sound clear. Then play only the bottom four strings until you’re confident that you have solved the problem.
When you’re at the point where it all sounds good again, then add in the remaining strings.
I know that sounds like a lot but trust me, once you follow these steps, you’ll likely never have to re-learn that chord again. Simply put, learn it right once, and you’ll have it for life!

Step 3: One Touch Method
The chord now sounds great. So we can move on to trying to remember and recall this new guitar chord.
Introducing the One Touch Method. As its name suggests, all you’re trying to do is get to the chord as quickly as possible without looking. When you grab it right the first time, you want to remove your hand just as fast.
This method will help you solidify the chord in your memory while building your muscle memory.
Correct yourself if you get it wrong. Then on the next attempt, pay extra attention to how your hand feels before you remove it. Go on! Give it a go!
Step 4: Use it in a song
To really remember this new guitar chord, we need to use it in a song. Pick a song with this chord in, then play the song for as long as possible. Find another song with this chord in it and play that too.
By applying this new chord, you pass it from your short-term memory to your long-term memory. So, you’re more likely to remember and recall it.
Step 5: Tag it to a style and use
Certain chords have their own use and can’t always come out to play! E9 or Bbm7#5 for example. Luckily, our E chord can be used every time we see an E chord.
You should also consider if your guitar chord has a special use or is it just a general chord that you can use all the time?
Most of the chords you’ll ever learn will be general ones that you can use all the time. However, some will be great for one application yet won’t work for others. So, we need to think about what I call tagging to a style.
For example, I have a set of guitar chords I’ll use for wide, open, big sounds. These chords use open strings to great effect and work great for slower songs or the instrumental break in the middle of fast songs where you want to create space and some light/shade to add depth to the song.
For a style like Bossa Nova, I have a set of guitar chords that are all commonly used in this style.
As you can see, I only use the set that is relevant to the style I’m playing.
I wouldn’t use Bossa Nova chords if I was playing funk. Nor would I use my simple country chords for playing metal! Simply put, stick to what sounds good for that style.

Step: 6 Congratulations you’ve learned a new chord!
You will have learned a new guitar chord in the right way. While you might have missed a few of these steps in the past, you now have a clearer idea.
The more new chords you learn, the fast you will become at following the 6 steps. It’s really the best way to learn guitar chords!
Let me know what chords you’ve learned using this process.




Leave a Reply